INDUSTRY LEADING SUPPORT
How can we help you today?
Find answers, run a practice test, check system status, or reach our team. Support is available 24/7 for test takers and administrators.
Start a live chat
Available 24/7 for test takers and administrators. Fastest response for exam-day issues.
Email Support
Fast, expert and nearly effortless. With industry-leading response times, we’ve got you covered.
Help Center
Find answers to common questions, troubleshooting steps, and guidance for using Integrity Advocate.
Access & login
Any issues with account access, login, results or certificate.
Any issues with account access, login, results or certificate.
If you’re having trouble logging in, can’t find your certificate, or need to request a refund or reattempt, please contact your activity or exam provider directly. Integrity Advocate does not manage:
User accounts or login credentials
Certificate delivery or pass/fail results
Refunds, session resets, or reattempt approvals
You can find your provider’s contact details on their website. Integrity Advocate only handles session verification once your activity has started.
Screen Recording
Learn how to allow screen recording on your device.
Learn how to allow screen recording on your device.
1. Before launching the exam/assessment, open System Settings by clicking on the Apple Icon.
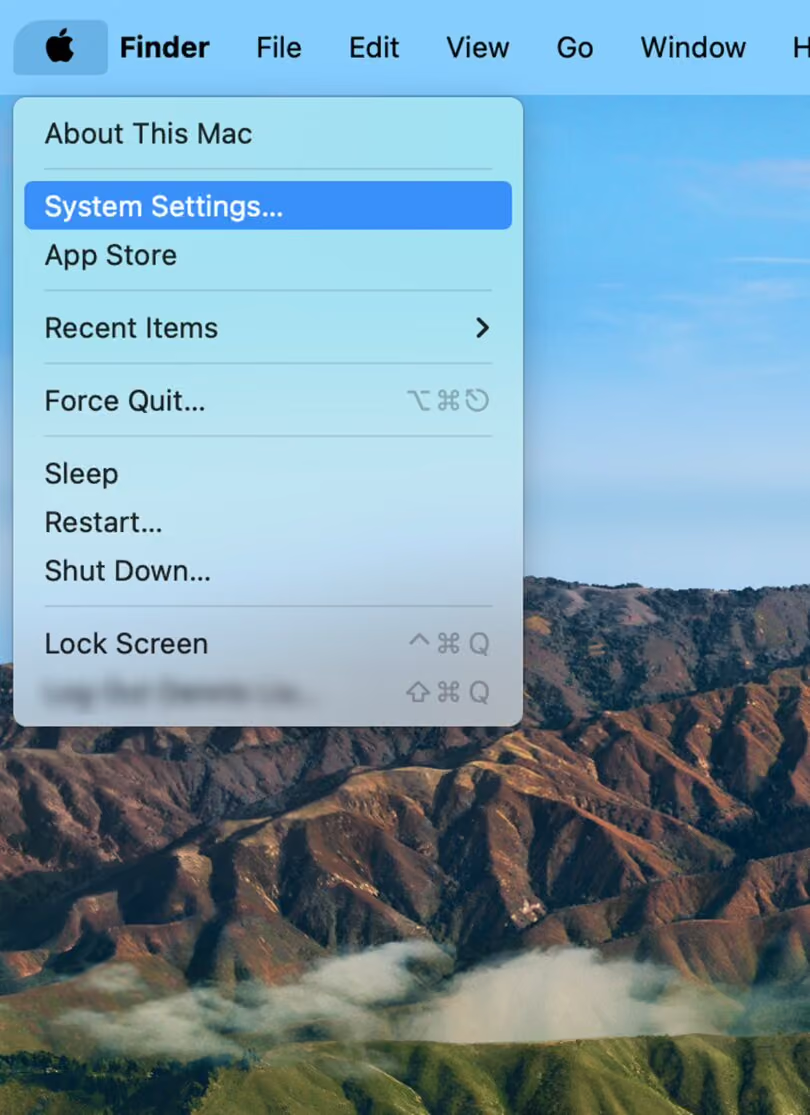
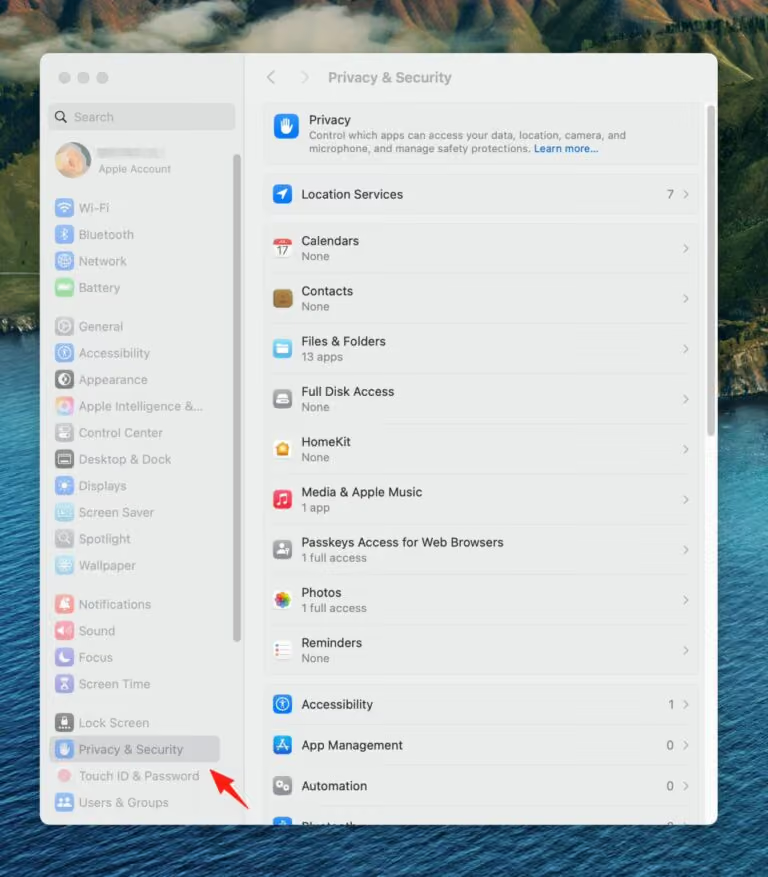
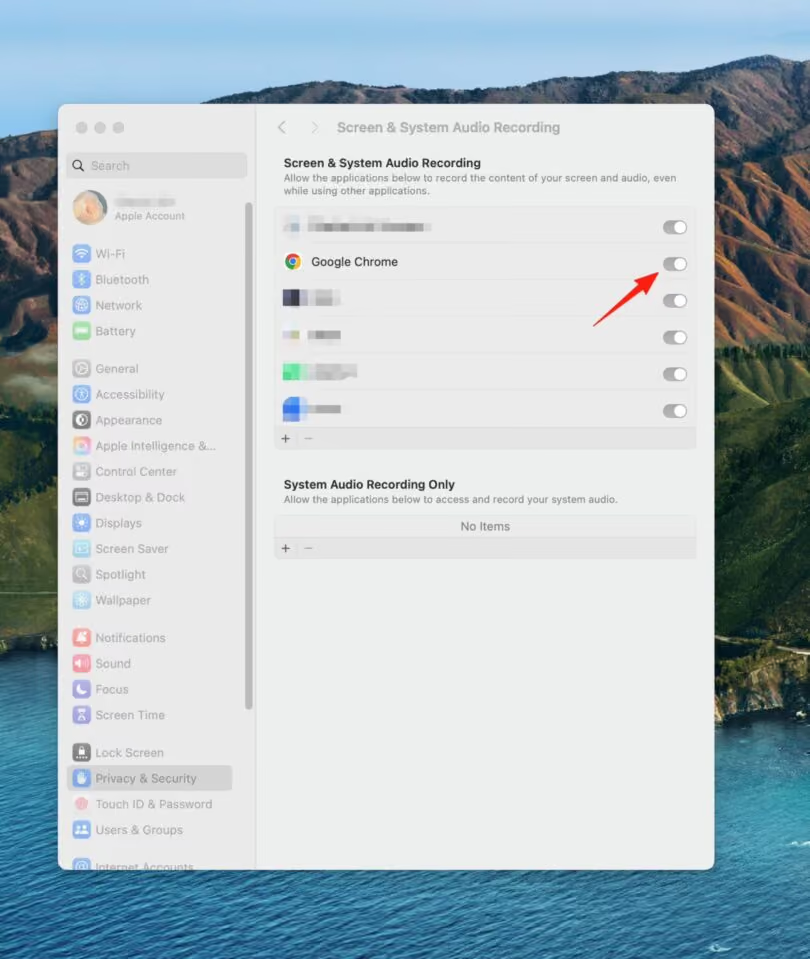
2. Select Privacy & Security from the left bar list, then scroll down to find and select Screen Recording.
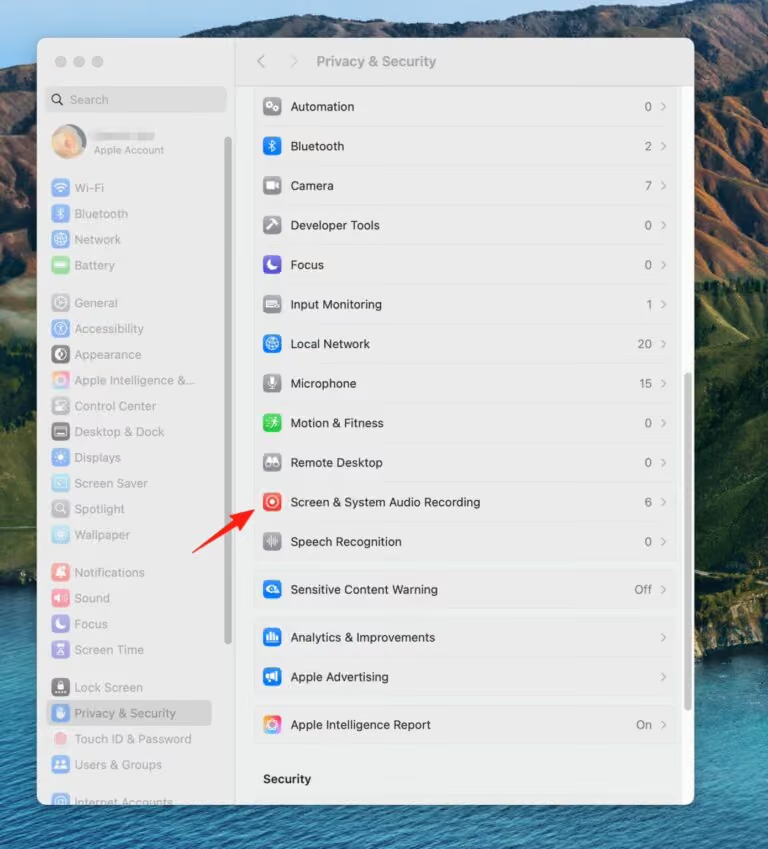
3. Under Screen Recording, toggle on Google Chrome.
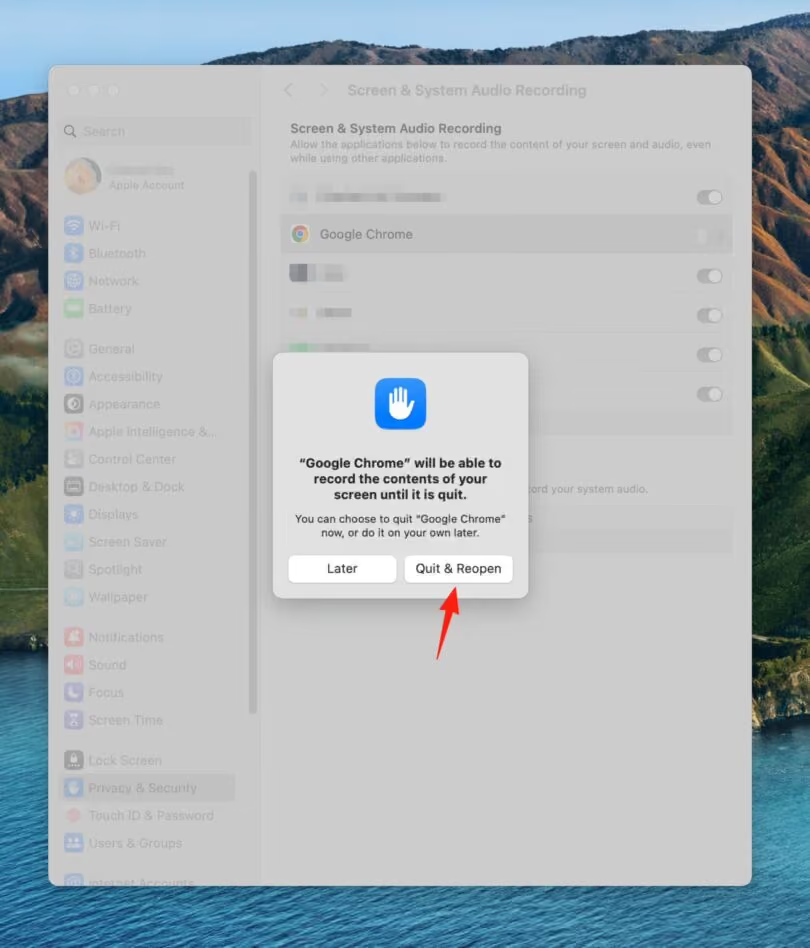
4. When prompted, click Quit & Reopen. The change will not take effect and you will not be able to share your screen until you quit and restart your browser. (Applicable when Chrome is open/running while doing this troubleshooting).
Video & Audio Setup
How to setup the video and audio environment during an activity.
How to setup the video and audio environment during an activity.
Windows
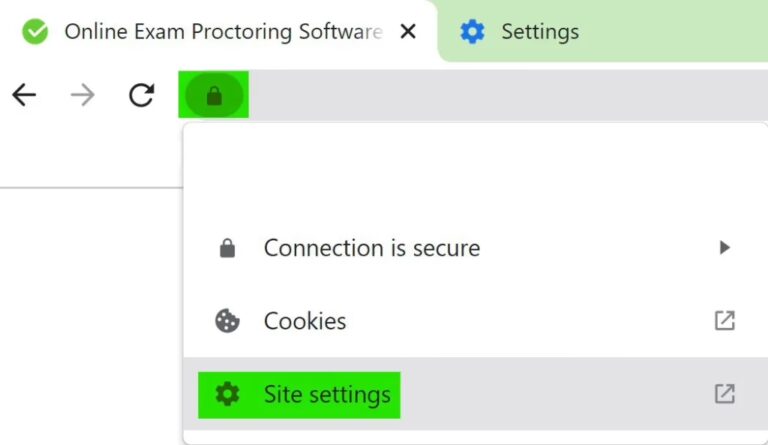
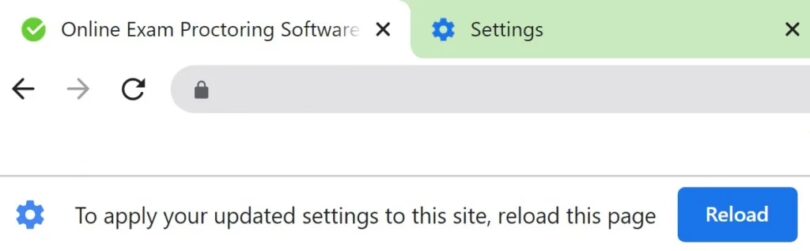
1. Click the lock icon in the URL/address bar and select ‘Site Settings’.
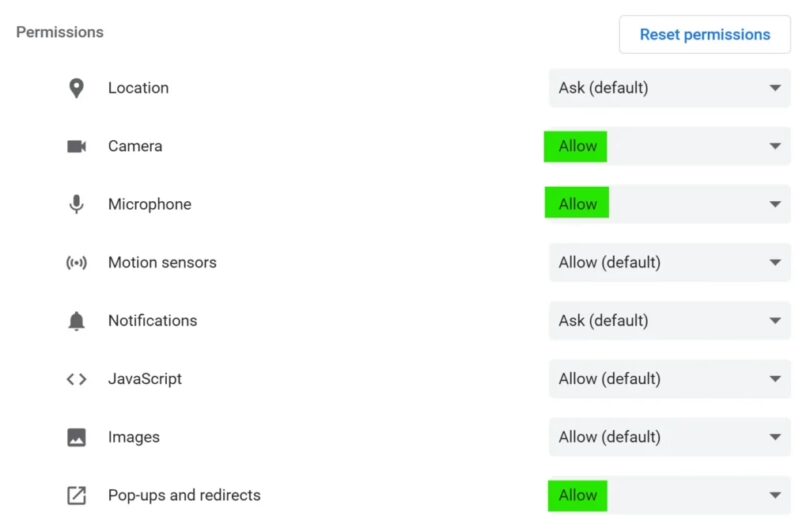
2. In the settings tab that opens, make sure the following permissions are set to ‘Allow’: Camera, Microphone, Flash, Pop-ups and Redirects.
3. Return to the exam/assessment page. If you see a message below the URL/address bar asking you to reload the page, click the blue ‘Reload’ button. Then, launch your exam or assessment.
MacOS
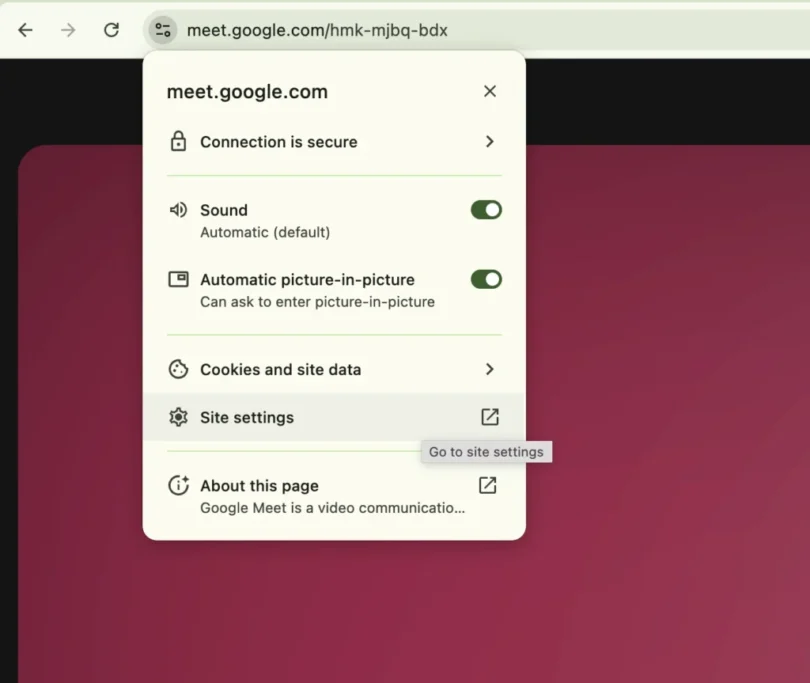
1. Click on the ‘setting’ menu on the left of the URL address bar and then select ‘Site settings’.
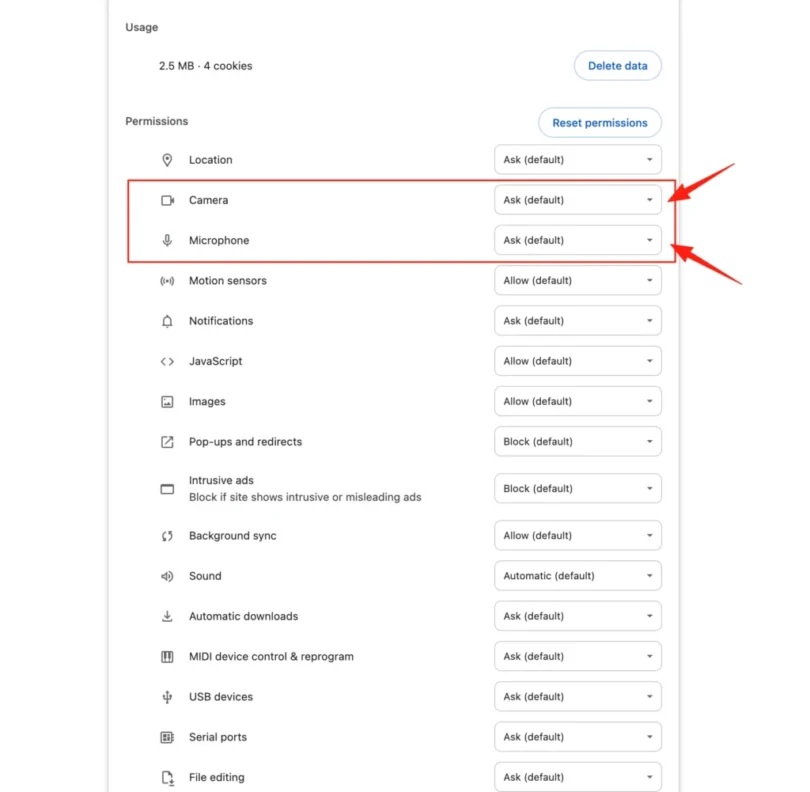
2. Change the ‘Ask’ beside the Camera & Microphone to ‘Allow’.
Android
1. Tap the Site Permission Icon at the top left corner of the page.
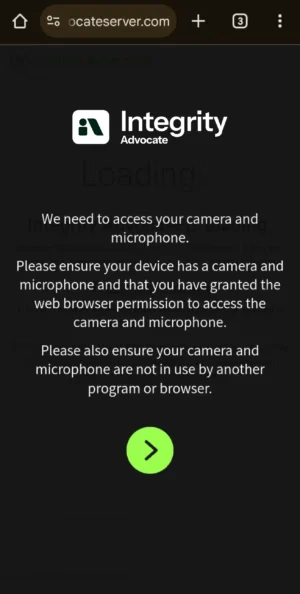
2. Tap on both ‘Camera’ and ‘Microphone’ and change the status from ‘Ask first’ to ‘Allow’.
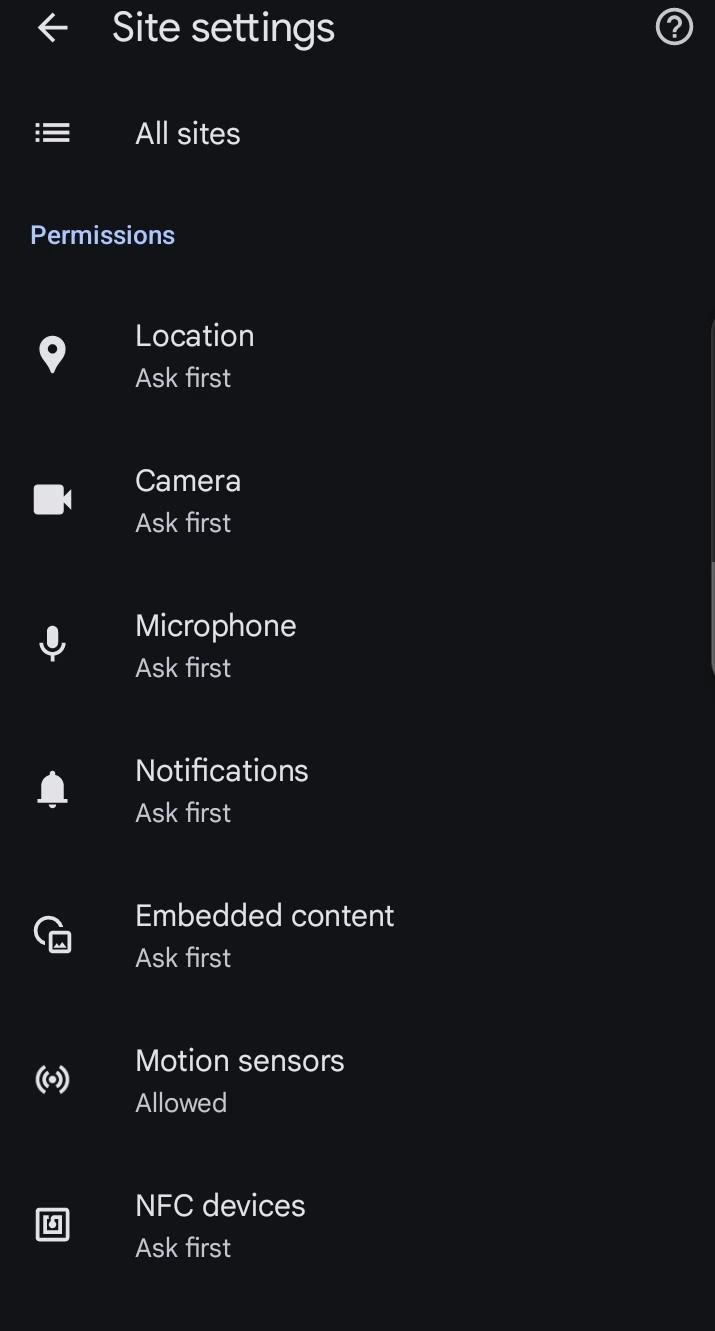
iOS
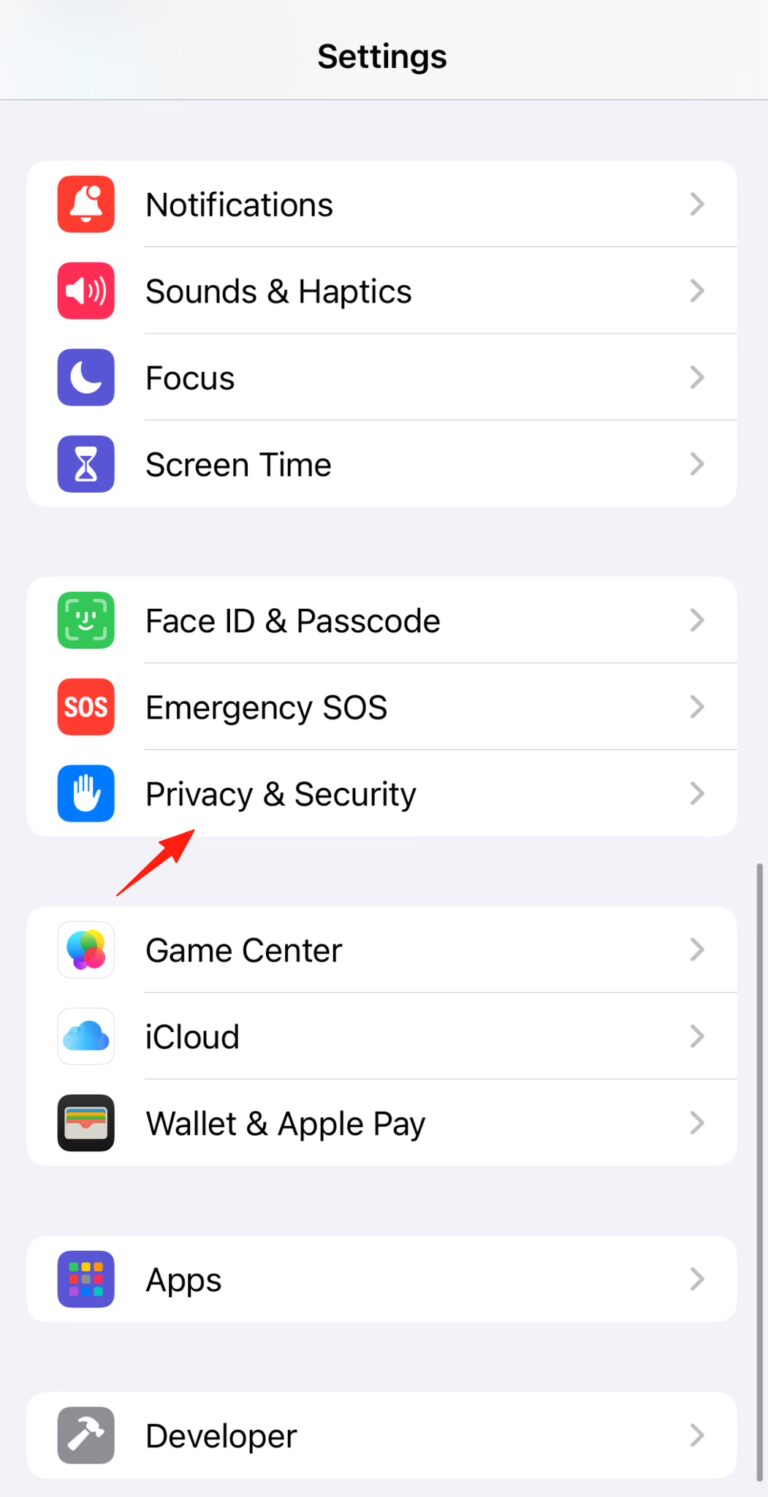
1. Open up ‘Setting’ on your phone and select ‘Privacy & Security’.
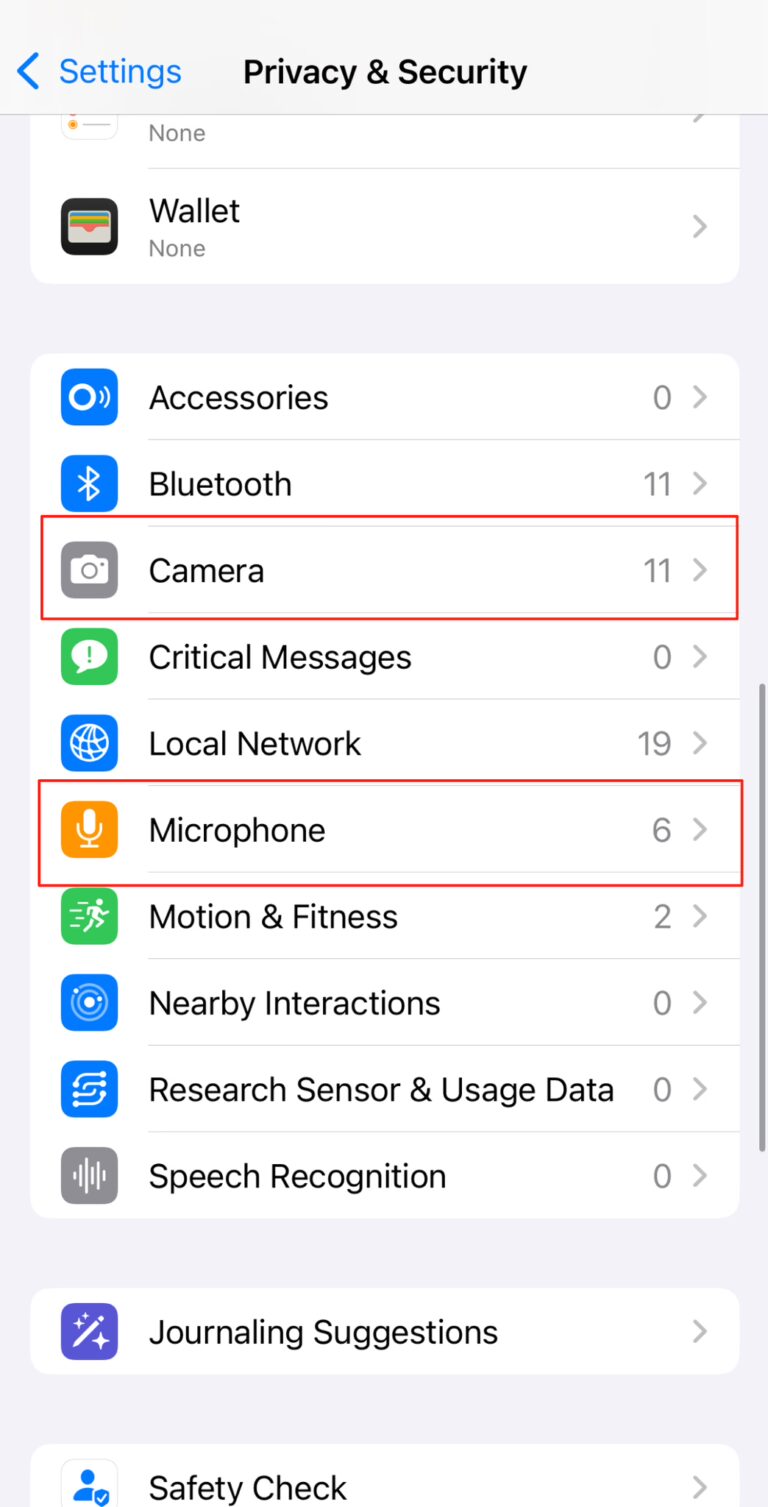
2. Go into ‘Camera’.
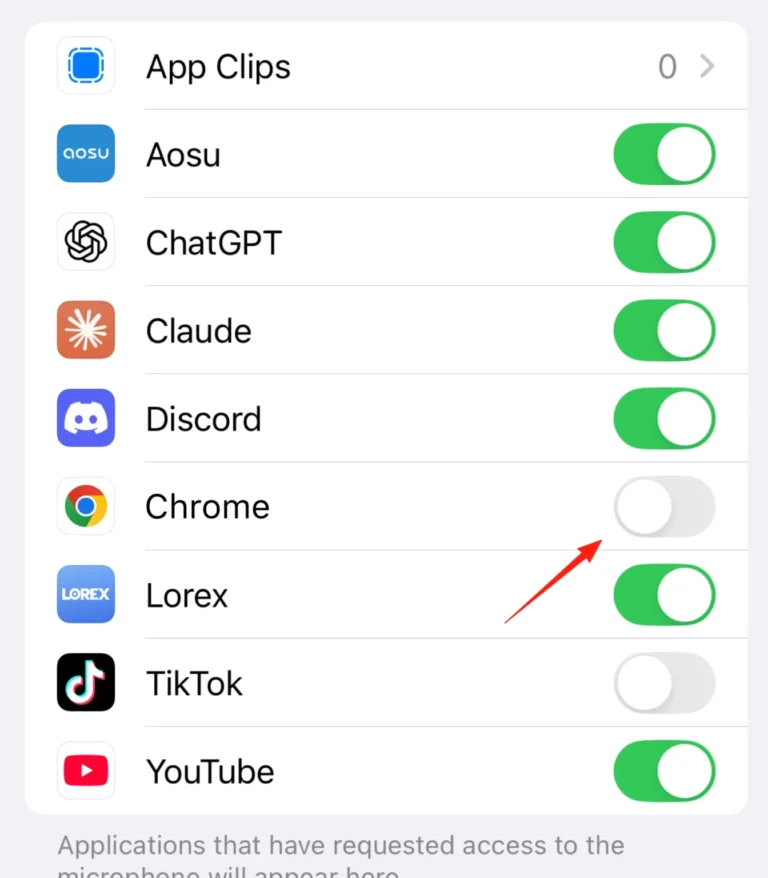
3. Find the ‘Chrome’ tab and turn the permission on to both the Camera page and Microphone page.
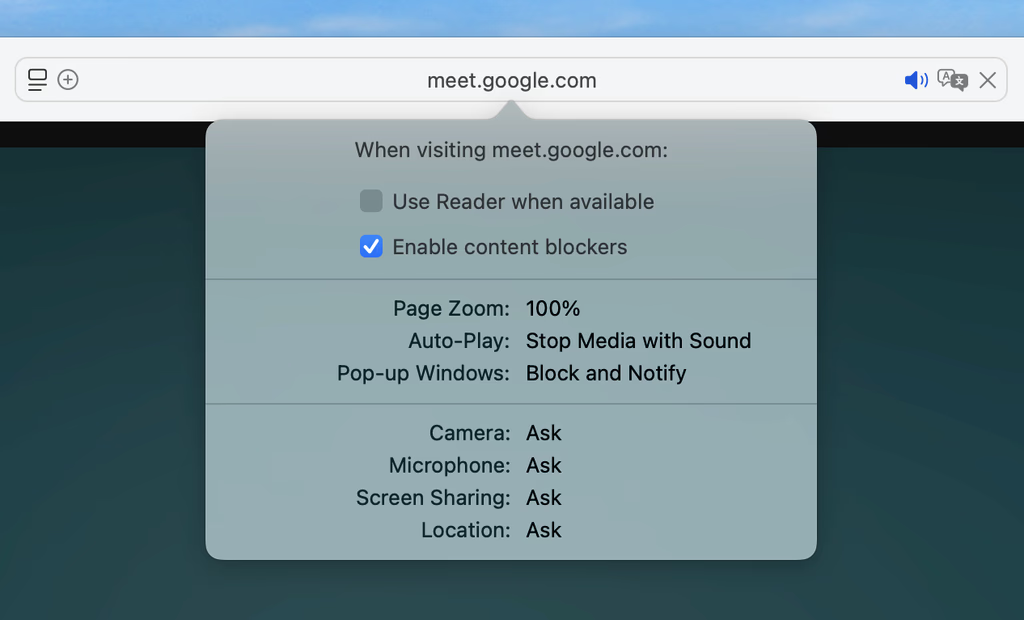
1. Click on the ‘Safari’ menu on the top left of your window and access ‘Setting’ for the website. (In the screenshot below it “Settings for meet.google.com”)
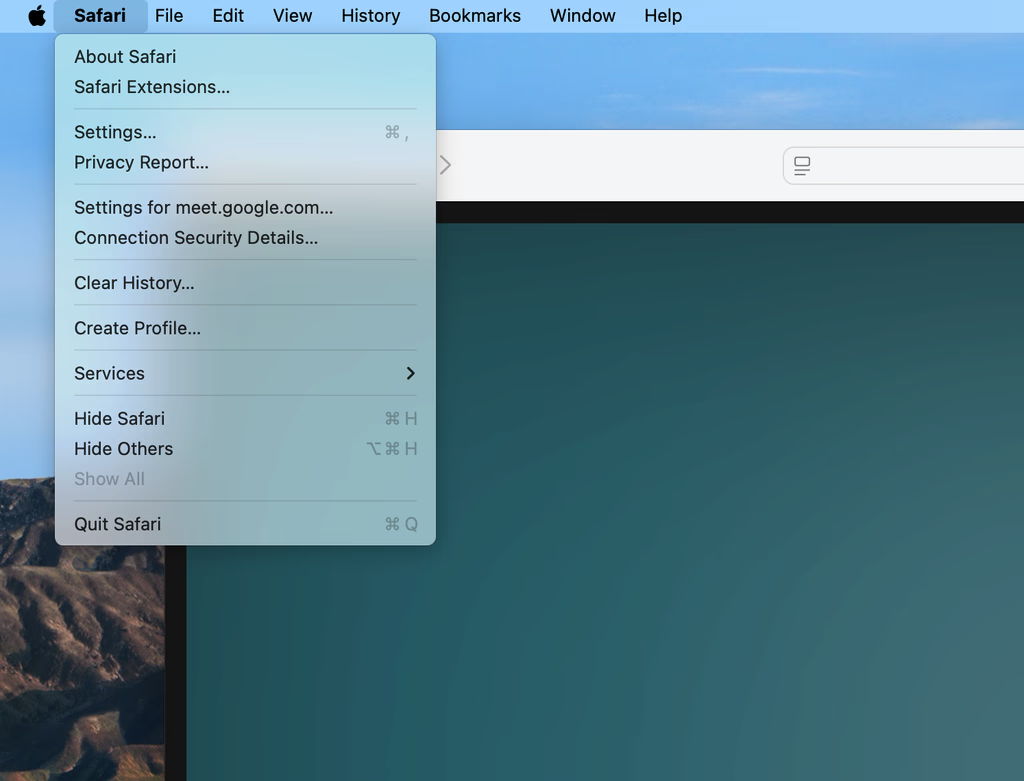
2. Change the ‘Ask’ beside the Camera & Microphone to ‘Allow’.
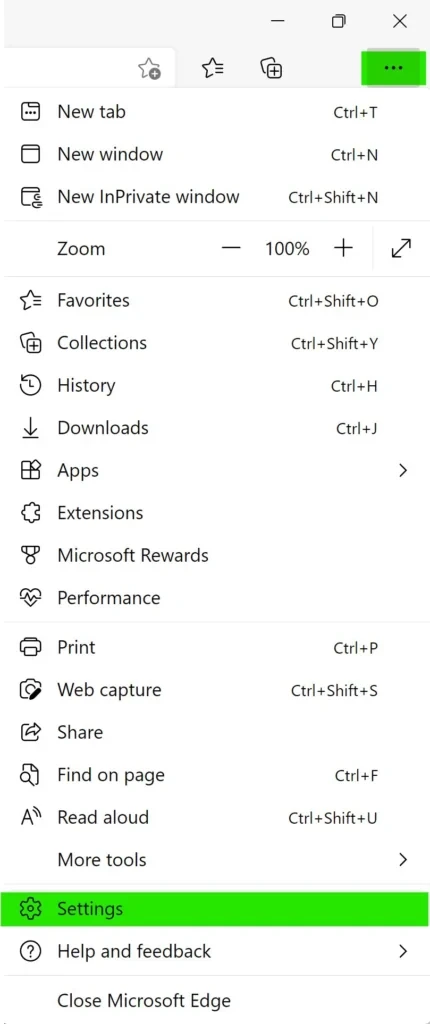
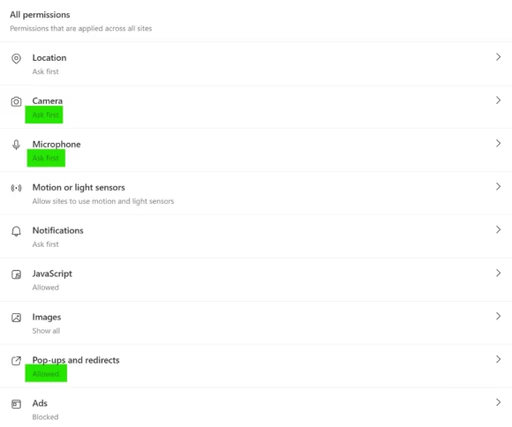
1. Click the three dots in your Edge browser and select “Settings.”
2. Go to “Cookies and site permissions.”
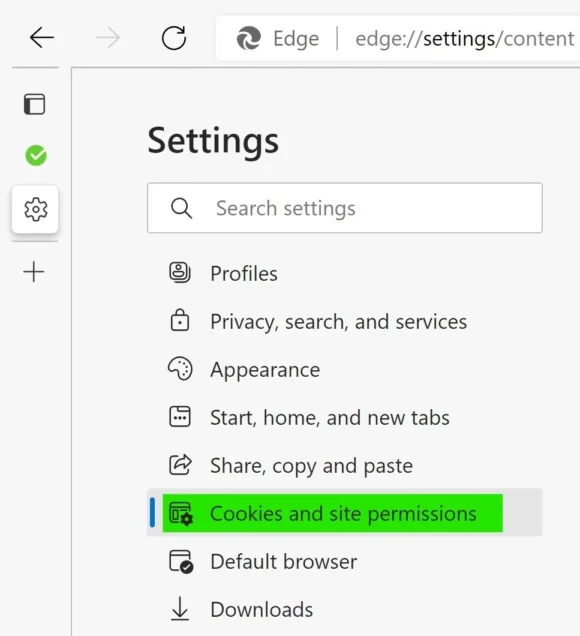
3. Select “Camera,” “Microphone” and “Pop-ups and redirects,” then adjust the settings as needed to match the instructions below.
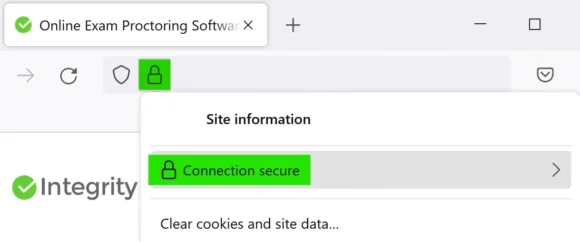
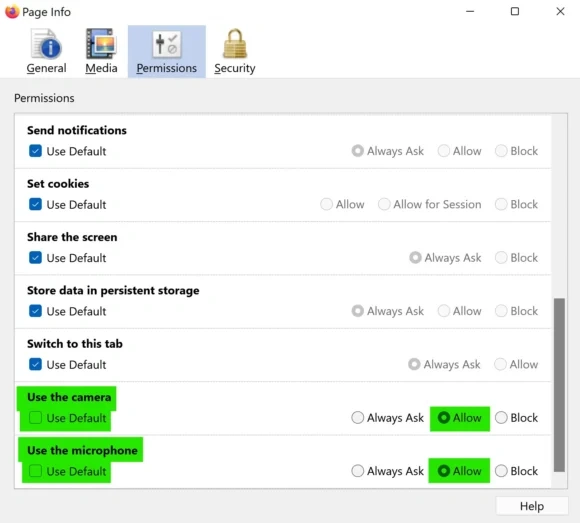
1. Before starting your exam or assessment, click the lock icon in the URL/address bar and select “Connection Secure.”
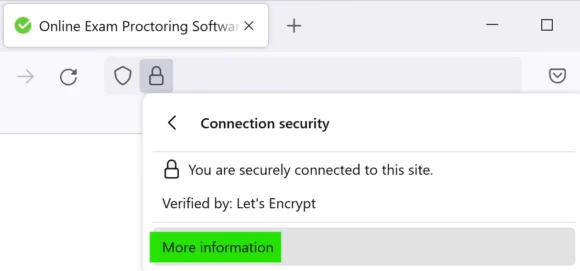
2. Click on “More Information.”
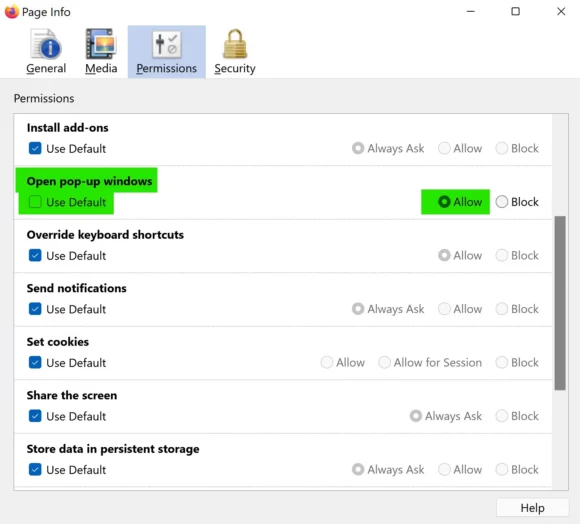
3. In the “Permissions” tab, allow the following: Open Pop-up Windows, Use the Camera and Use the Microphone.If the “Use Default” box is checked, uncheck it before selecting “Allow.”
ID Verification
How to setup your session, camera and browser.
How to setup your session, camera and browser.
If you received an email asking you to resubmit your ID, it means we couldn’t verify either your face or name usually due to unclear photos or missing details.
To resubmit:
Open the email and click the Resubmit button.
Use a mobile phone for clearer photos.
When retaking your ID and face photo
Make sure the ID is the one required by your activity provider.
Ensure your face and ID are fully visible, with no glare or blur.
Take the photo in a well-lit area with minimal shadows.
If you received an email about a name mismatch, it means the name on your ID doesn’t match the one registered for your session.
Here’s what to do:
Open the email and click the “View” button to see more details.
Double-check your name in your course, training, or learning platform account.
If there’s a typo, nickname, or other mismatch, contact your activity provider or course administrator. Only they can update your name or guide you on how to proceed.
Note: Integrity Advocate cannot make changes to your name. All updates must be handled by the organization running your course or exam.
Potential Violations
What to do after a potential violation during a session.
What to do after a potential violation during a session.
If you received an email about a potential violation, it means there may have been activity during your session that didn’t follow the rules set by your activity provider.
Here’s what to do:
Open the email and carefully read the details provided.
If you have questions or believe there’s been a mistake, contact your activity or exam provider directly. They’re the only ones who can decide what happens next.
Note: Integrity Advocate only provides the proctoring service. Any decisions or actions regarding violations must come from your activity or training provider.
Device & Browser Compatibility
Find ways to resolve any compatibility issues you may have with your device and browser.
Find ways to resolve any compatibility issues you may have with your device and browser.
This message means you’re using an outdated browser (like Internet Explorer or older Safari versions) or an unsupported operating system (like Windows 7 or macOS High Sierra).
To fix it:
Update your browser to a supported version like Chrome, Edge, or Opera.
Update your operating system to a more recent version.
If updating isn’t possible, try using a different device.
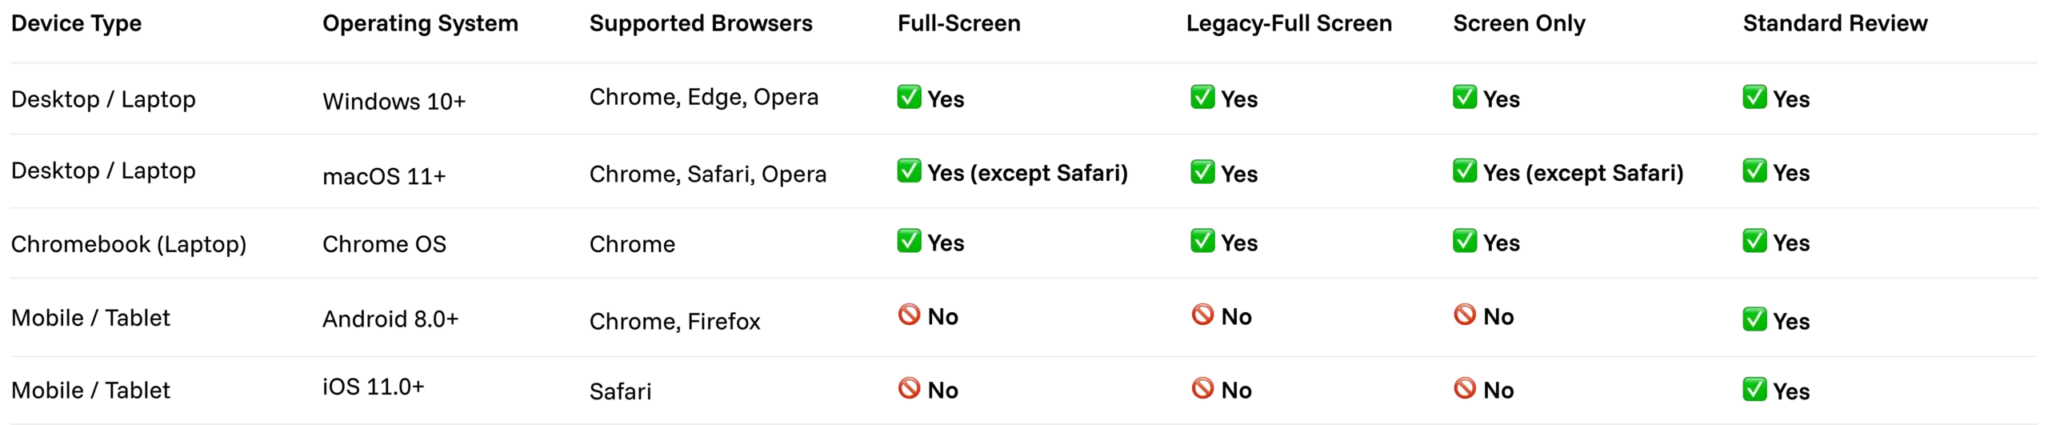
Integrity Advocate works on most modern computers, phones, and tablets as long as your device has a working camera, microphone, and stable internet. However, certain monitoring features (like full-screen monitoring or screen capture) are only supported on desktop and laptop browsers.
Please review the tables below to see what’s supported for your device and session type:
Device Compatibility & Feature Support
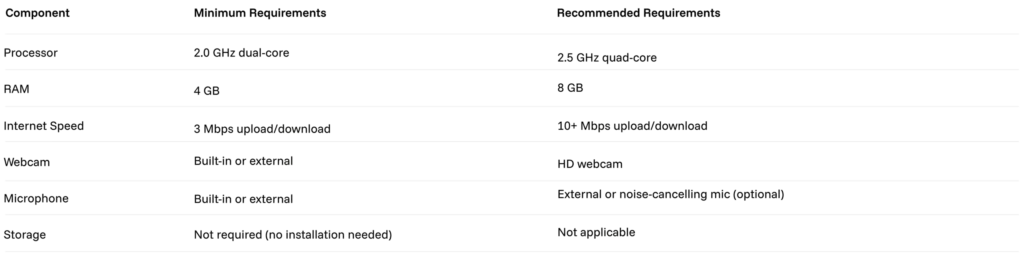
System Requirements
Starting a Session
Find answers to all the issues you have with starting a session.
Find answers to all the issues you have with starting a session.
To ensure a successful room scan, please follow this process:
1.Prepare Your Space
Before starting the camera, clear your environment of any prohibited items:
- Smartphones, tablets, or smartwatches
- Notes, books, or papers
2. Perform the Scan
Once prompted, you will need to perform two distinct movements with your webcam or laptop:
- 360° View (30 Seconds): Slowly rotate your camera in a full circle. Ensure you capture all four walls from floor to ceiling.
- Workspace View (30 Seconds): Tilt your camera down to clearly show your desk surface, your keyboard, and the area underneath your desk.
Important Note: If your scan is blurry or incomplete, you may be asked to rescan. Multiple failed scans could result in removal from the activity, so please ensure your lighting is adequate and your movements are steady.
Nope! Admin Codes are only for administrators.If you’re asked for one during your session, just click the “X” to close the prompt and then click the green arrow to continue.
User Privacy
Learn how your personal information and ID are protected.
Learn how your personal information and ID are protected.
Integrity Advocate only collects the information necessary to verify your identity and ensure compliance with session rules.
You can find full details on our privacy practices here: https://integrityadvocate.com/privacy/
If you have questions or want to request changes to your data, contact: privacy@integrityadvocate.com
For general support: support@integrityadvocate.com
Yes! When you’re asked to take a photo of your ID, you can block out sensitive information before submitting it.
After taking the photo, look for the Edit button. Then:
Click and drag over the area you want to block (like your ID number or address).
Release your mouse or finger, the selected area will be covered.
Once you’re satisfied, submit the edited photo.
This allows you to show only what’s only needed: your name and face.
Run a quick practice test
Complete a practice test to check your technical requirements and avoid last-minute issues during your assessment. We'll check your camera, microphone, browser compatibility, and internet connection to help ensure everything is working before test day.
No data is collected or recorded during the practice session.